Creating an audit workspace
How to set up a new audit workspace in AssureGrid, including required inputs, form fields, and what happens after the workspace is saved.
Purpose
This page explains how to create a new audit workspace in AssureGrid. Creating a workspace establishes the audit context, team ownership, framework alignment, timing, and source memo needed for the rest of the audit lifecycle.
When to Create a Workspace
Create a workspace when:
-
a new audit engagement is starting
-
a team needs a dedicated space to manage one audit end to end
-
audit planning is ready to begin
-
the audit memo and key engagement details are available
Before You Begin
Before creating a workspace, make sure you have the following information ready. Having these inputs prepared will make setup faster and reduce the need for later corrections.
| Field | Description |
|---|---|
| Workspace Name | A clear, recognizable name for the audit engagement. |
| Audit Topic or Scope | The subject matter or scope of the audit. |
| Entity or Region | The organizational unit or geographic region being audited. |
| Applicable Framework | The compliance or control framework that applies to the engagement. |
| Team Member Information | Names, email addresses, and roles of team members to assign. |
| Audit Memo File | The supporting memo document that provides audit context. |
| Review or Target Dates | Start date and anticipated end date where applicable. |
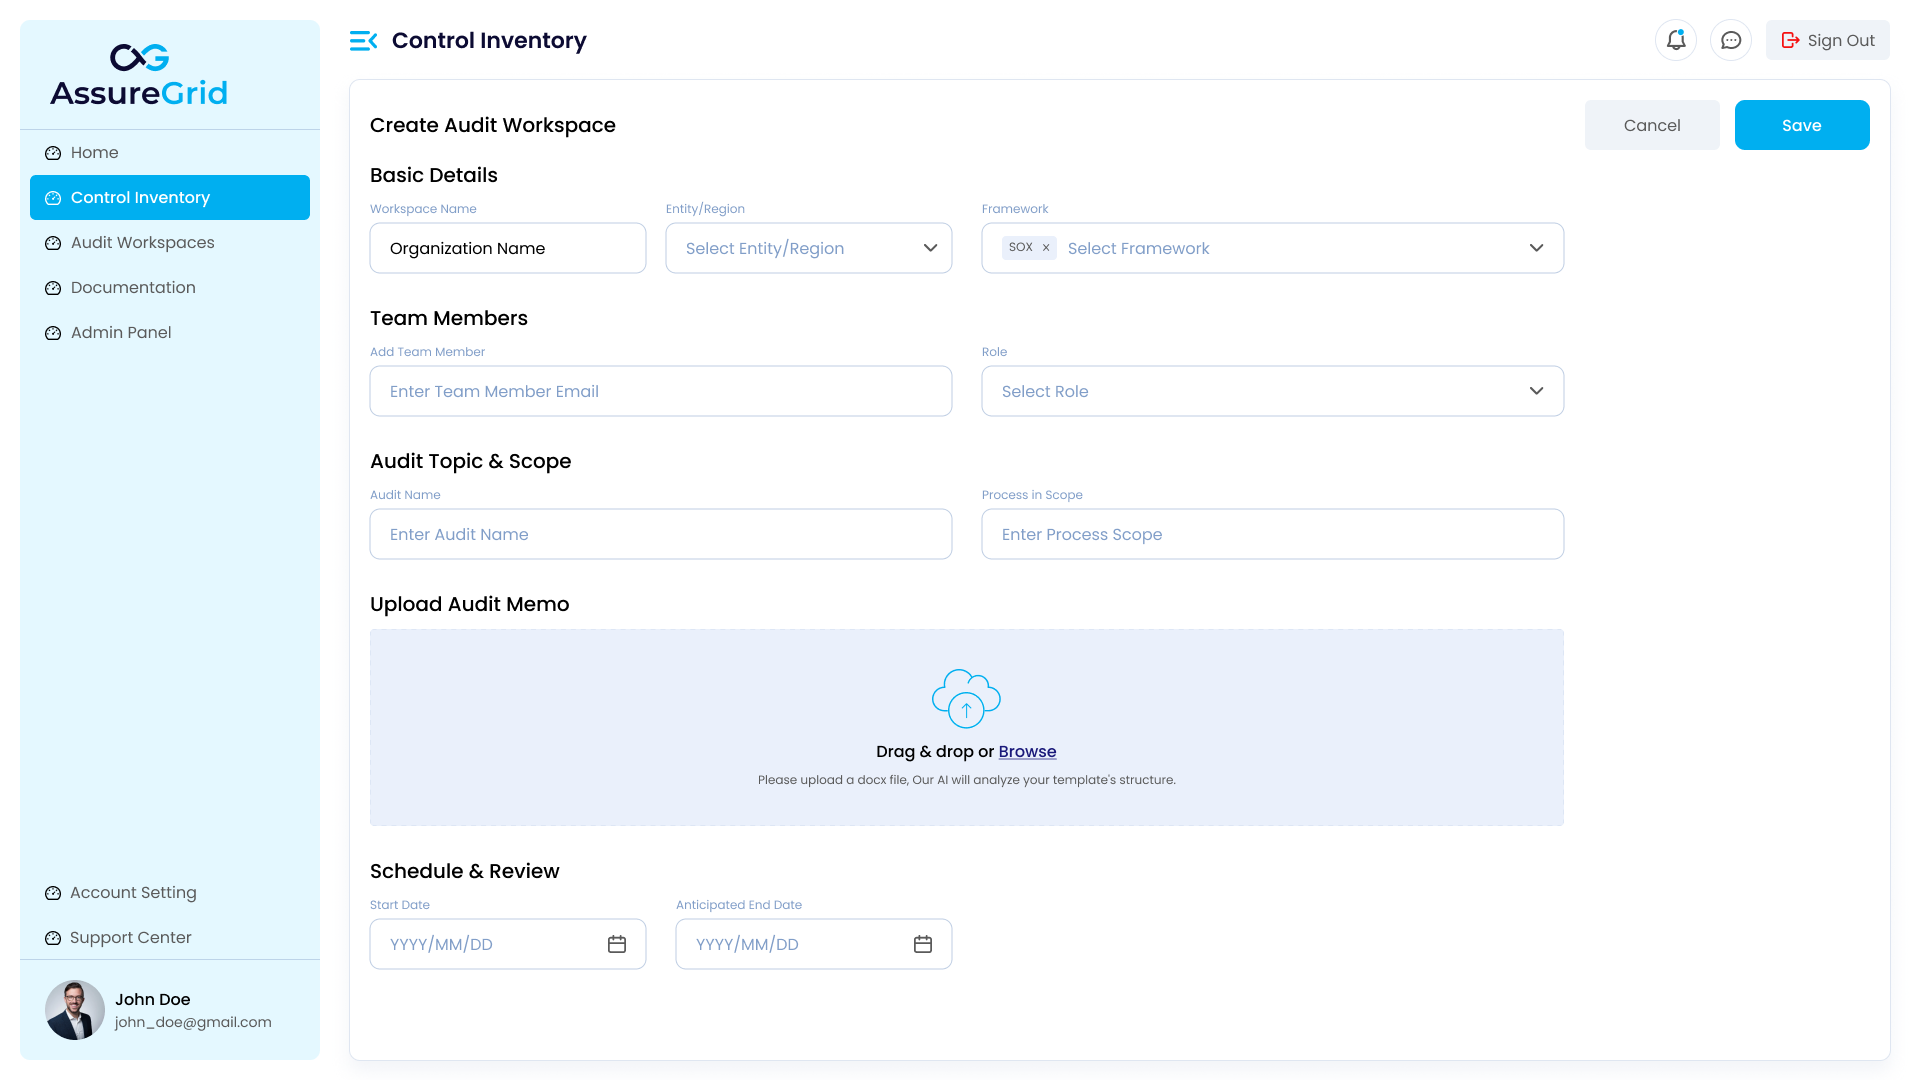
Main Sections in the Workspace Creation Form
The workspace creation form usually includes the following sections:
-
basic audit identification details
-
framework and entity context
-
team assignment
-
date fields
-
memo upload
-
save and cancel actions
Fields
Depending on the configuration, the form may include the following fields. Some implementations may include additional related context fields.
| Field | Description |
|---|---|
| Workspace Name | Unique name for the workspace. |
| Audit Topic | Subject or scope of the audit. |
| Entity / Region | Entity, region, or business context for the engagement. |
| Framework | Applicable compliance or control framework. |
| Team Member Email | Email address of team member being assigned. |
| Team Member Role | Role of the team member within the workspace. |
| Audit Memo Upload | File upload field for the audit memo. |
| Start Date | Date the workspace becomes active. |
| Anticipated End Date | Target completion date for the engagement. |
Step-by-Step Instructions
Step 1: Open the Create Workspace Flow
Access the workspace creation form by following the steps below.
- From the main navigation, select Audit Workspaces.
- Click + or Create Workspace.
Expected Outcome
The workspace creation form opens.
Step 2: Enter the Workspace Name
Enter a clear and recognizable workspace name so users can easily identify the audit area, business unit or region, and relevant period where applicable.
Workspace Naming Examples
- ITGC Audit - APAC
- Vendor Access Review - FY25
- Finance Controls Audit - Shared Services
Tip
Use your organization’s standard naming convention, if one exists, to maintain consistency across the workspace list.
Step 3: Enter the Audit Topic and Context
Provide the audit topic or scope so the workspace has a clear operational identity. This helps users understand the purpose of the workspace before opening it.
Step 4: Select Entity or Region
Select the entity, region, or business context associated with the engagement. This helps position the audit correctly within the organizational structure.
Step 5: Select Framework
Select the framework applicable to the audit. The framework helps define how subsequent planning and execution activities are structured and interpreted.
Step 6: Add Team Members
Assign the relevant team members to the workspace. This typically includes each user’s email address and assigned role within the workspace or audit engagement. Team assignment establishes ownership, responsibility, and access.
Notes on Team Assignment
Make sure:
-
the correct users are assigned
-
roles reflect the expected working model
-
only relevant members are added at the start
Additional team members or role changes can be managed later if required.
Step 7: Upload the Audit Memo
Upload the audit memo that supports the engagement context. The memo provides background, scope, expectations, and review context for later planning activities.
Audit Memo Upload Methods
The memo can typically be uploaded by:
- dragging and dropping the file into the upload area
- browsing and selecting the file from your device
Expected Outcome
The memo appears in the form as an uploaded file.
Step 8: Select Dates
Enter the relevant engagement dates, such as Start Date and Anticipated End Date. These dates help track the expected lifecycle of the engagement.
Step 9: Save the Workspace
After all required fields have been completed, review the information carefully before saving.
- Review the entered details.
- Confirm team assignments.
- Confirm the memo upload.
- Click Save.
Expected Outcome
The workspace is created successfully and appears in the workspace list. Depending on the implementation, the user may be returned to the workspace list, taken directly into the newly created workspace, or shown a confirmation state first.
Canceling Workspace Creation
If the user clicks Cancel before saving:
-
the creation form closes or exits
-
the workspace is not created
-
no partial workspace should be committed
What Happens After Creation
Once the workspace is created, the next typical step is to open it and review the workspace overview dashboard. From there, the user usually proceeds into Audit Planning and then later lifecycle stages as the audit progresses.
Tips for Creating a Good Workspace
-
Use clear naming from the beginning.
-
Make sure the framework is correct before saving.
-
Upload the right memo version.
-
Assign the correct team members early to avoid confusion later.
-
Double-check dates before creating the engagement.
Common Issues
| Issue | Resolution |
|---|---|
| I created the workspace but cannot find it | Return to the workspace list and use search or filters. |
| I forgot to add a team member | Depending on permissions, you may update team setup later through the relevant management flow. |
| I uploaded the wrong memo | If workspace editing is supported later, replace it there; otherwise recreate if necessary based on process rules. |
| The save action is not working | Check whether any required fields are still incomplete. |